

ROS 2 Nodes
“Begin at the beginning,” the King said gravely, “and go on till you come to the end: then stop.” – Lewis Carroll, Alice in Wonderland

The next ROS 2 tutorial dives into ROS 2 Nodes. Take a moment to read through the tutorial now, though you may not immediately understand it all on your first pass through.
Graph Theory
Before we can understand what nodes are, we must first understand what a graph is. Wikipedia defines a graph as:
A graph is a structure amounting to a set of objects in which some pairs of the objects are in some sense "related". The objects correspond to mathematical abstractions called vertices (also called nodes or points) and each of the related pairs of vertices is called an edge (also called link or line).[1] Typically, a graph is depicted in diagrammatic form as a set of dots or circles for the vertices, joined by lines or curves for the edges.
At the time of this writing, the Wikipedia entry on graphs is illustrated with this figure:
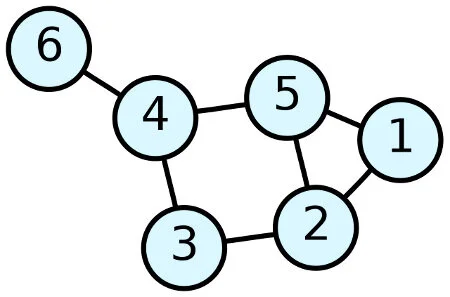
Denotes a six node (or vertex) graph (denoted by circles) with seven edges (denoted with lines).
What ROS terms a “Node” is analogous (in the figure) to a circle. Edges can be viewed as publishers, subscribers, or used to pass messages between nodes as illustrated here:

Image credit ros.org
A Concrete Example
The following is a concrete example of ROS 2 running a few simple Nodes. We assume you already have ROS 2 installed somewhere. If not, follow the previous tutorial on this blog. Don’t forget to source your shell file if it’s not already sourced someplace else!
First, start turtlesim in a terminal and then in a second terminal window enter:
ros2 node list
You should see the terminal return the node name:

ROS 2 Node Listing
Now we will interact a bit with our turtle. Open another new terminal and start the teleop node with the command:
ros2 run turtlesim turtle_teleop_key
Pro Tip: ensure you are focused on the teleop_key window (NOT the turtlesim window).
Doing so should allow you to “drive” your turtle with the arrow keys. After a few turns my turtle looks like this:

ROS 2 Turtle after a few keyboard moves
You can also get a listing of all the traffic into and out of your turtle. Call:
ros2 node info /turtlesim
and you will get just such a listing:

ROS node info for /turtlesim node with a keyboard teleport operator attached.
Further Viewing
ROS 2 Nodes are described in reasonable detail in this YouTube video.